Monthly Archives: June 2018

Release 18.06.29 [Beta]

System Changes

  • Powercode no longer deletes rate plans from Saisei as it causes unexpected behavior and deleting them from Saisei is not necessary.
  • We set hosts without an access point relationship in Saisei to ‘<none>’  to avoid some unexpected behavior.

Bug Fixes

  • Customer Alerts no longer push to all users in some cases.
  • We no longer flag Baicells credentials as missing if they’re not actually missing.
  • Disabled Network Sites no longer appear in related selectors.

Miscellaneous

  • Simply opening the edit RMU page will no longer cause the RMU to show as out of sync.
  • More reliably push signatures into Saisei from Powercode.
By |2018-06-29T16:50:31-05:002018 June 29th|Changelog|Comments Off on Release 18.06.29 [Beta]

Release 18.06.28 [Beta]

Bug Fixes

  • Several cases where updates in Powercode would not push properly to the Saisei have been corrected.

Miscellaneous

  • cnMaestro will now try to find the wireless mac if no lan mac is found.
By |2018-06-28T17:07:33-05:002018 June 28th|Changelog|Comments Off on Release 18.06.28 [Beta]

Ticketing Best Practices Webinar TOMORROW!


Have you ever wondered if you’re using ticketing to it’s fullest? Know what categories, types, and groups are for? Know when to use updates and when to use comments? Get the answers to these questions and many more.

Tune in to streamline your workflow and make sure you’re providing your customers with the best experience!

By |2018-06-27T10:49:57-05:002018 June 27th|News|Comments Off on Ticketing Best Practices Webinar TOMORROW!

Release 18.06.26 [Beta]

Features

  • New SubAccountClass report has been added to the Report Dashboard.

Bug Fixes

  • Saisei policies and rate multipliers now push properly to the STM.
  • Updating services with Saisei no longer causes Slave BMUs to kick off into a bad status.
  • Reversed upstream and downstream rate multipliers to match the correct field.
By |2018-06-26T09:23:38-05:002018 June 26th|Changelog|Comments Off on Release 18.06.26 [Beta]

Release 18.06.25 [Beta]

Bug Fixes

  • Overage services didn’t always update new values properly, this has been fixed.
  • Missing config values no longer prevent customers from adding Credit Cards in the Customer Portal.
  • A case where graphs would fail to record SNMP data has been fixed.
  • Twilio Opt-In from the Customer Portal will now toggle correctly.

Miscellaneous

  • Added internal subnet validation when saving.
  • ISP Description is no longer a required field when adding a service.
  • Non-default tabs were showing on page load for services, these are now hidden.
By |2018-06-25T15:34:24-05:002018 June 25th|Changelog|Comments Off on Release 18.06.25 [Beta]

Manage Your Inventory

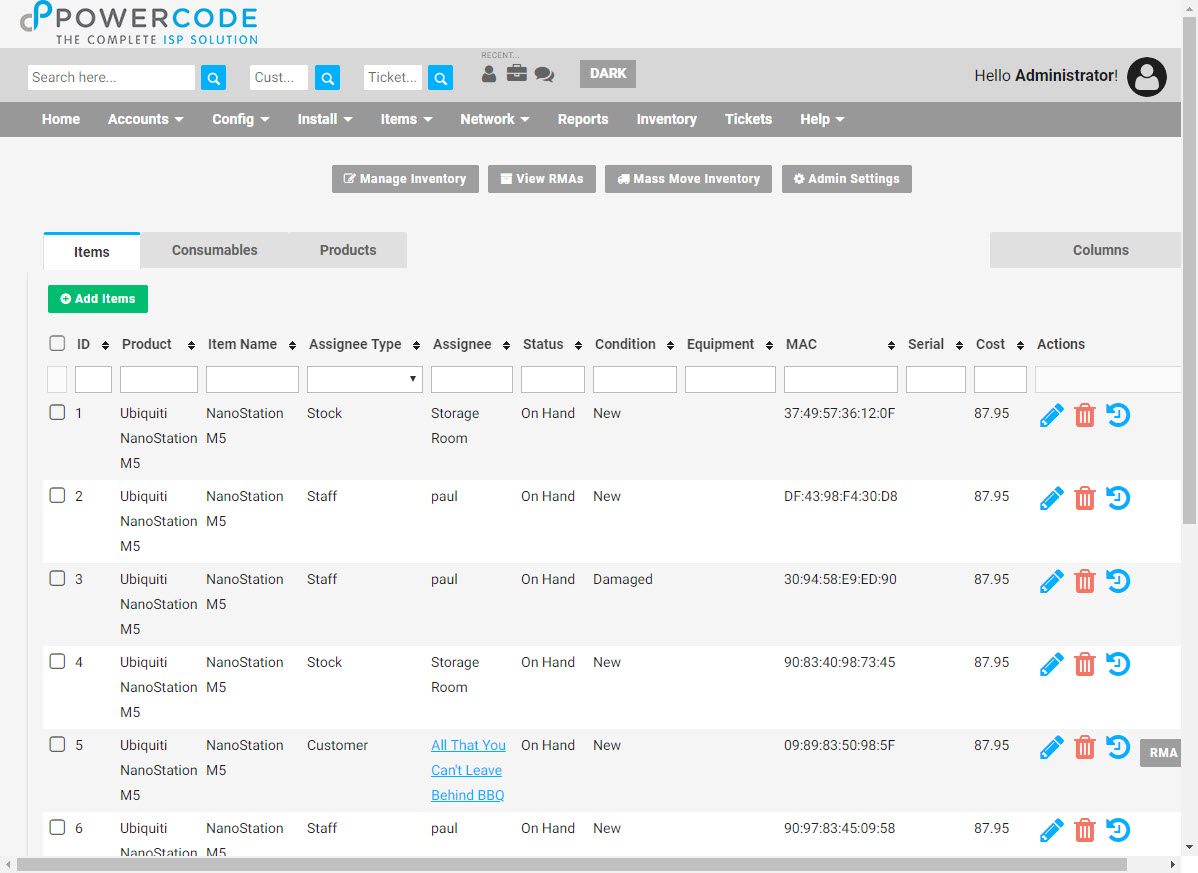
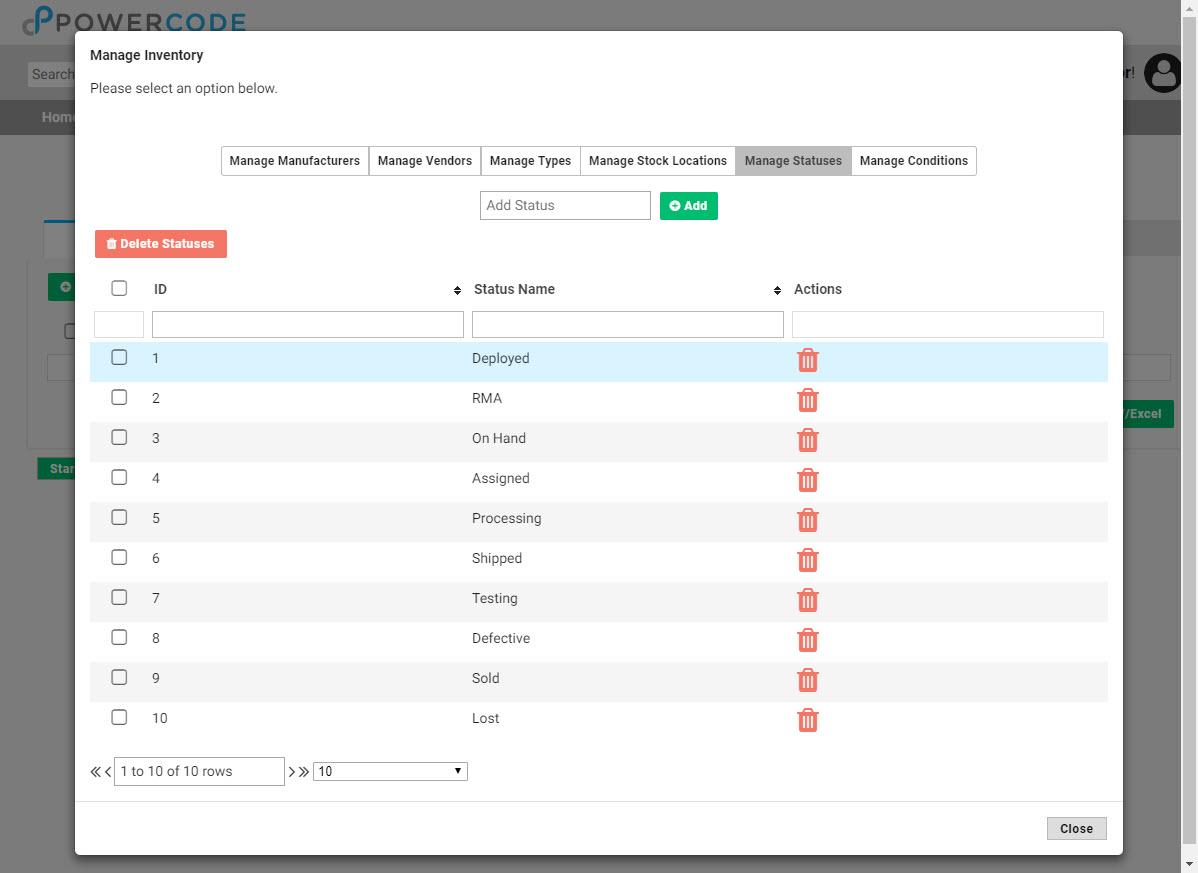
Managing inventory properly can ensure your tech’s have the equipment they need to complete their jobs, track trends and mitigate theft. Powercode makes it easy to know where every item is once it’s delivered. To begin using the inventory feature you will need to establish all of your products and consumables, click on the ‘Inventory’ tab at the top of any screen then click the ‘Manage Inventory’ button.  The manufacturer and type for each item will need to be built and any vendors should be added too. Stock locations indicate where the items are stored and checked out from so most will only have one unless you maintain a remote stock facility. The ‘Statuses’ and ‘Conditions’ tabs come populated with all the scenarios needed, but the ability to add custom ones for any outliers is still available.

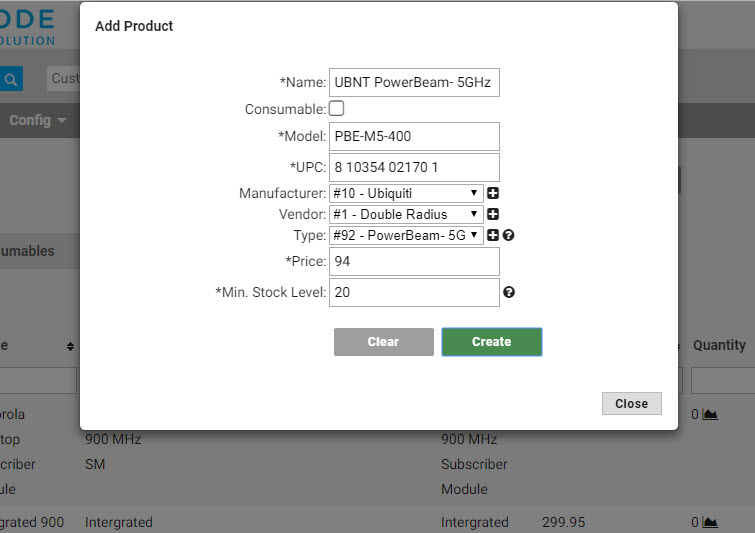
Next make sure to click on the ‘Admin Settings’ button and enter the email address of your purchasing agent or whoever is responsible for keeping equipment in stock. Then click the green ‘Create Product’ button on left hand side under the ‘Products’ tab and add a product for each individual type of equipment that will be tracked. This default information can also be overwritten when entering the actual items into stock. Pay special attention as to whether it is an item with a trackable serial number and MAC or if it’s a consumable and check the box if so. When the count of an item/consumable in a stock location drops below the number set in the ‘Min. Stock Level’ box, a warning email is sent the address established in the aforementioned ‘Admin Settings’ box.

Now the actual items can be added to stock from the green ‘Add Items’ button under the ‘Items’ tab. If multiple of the same item are being added at once, click on the ‘Bulk entry mode’ link with the lock icon. Then click on each lock next to the line that will remain the same for each entered item. Typically that will be for all except the MAC, DUID and/or Serial. A USB barcode scanner can be purchased making input significantly quicker.

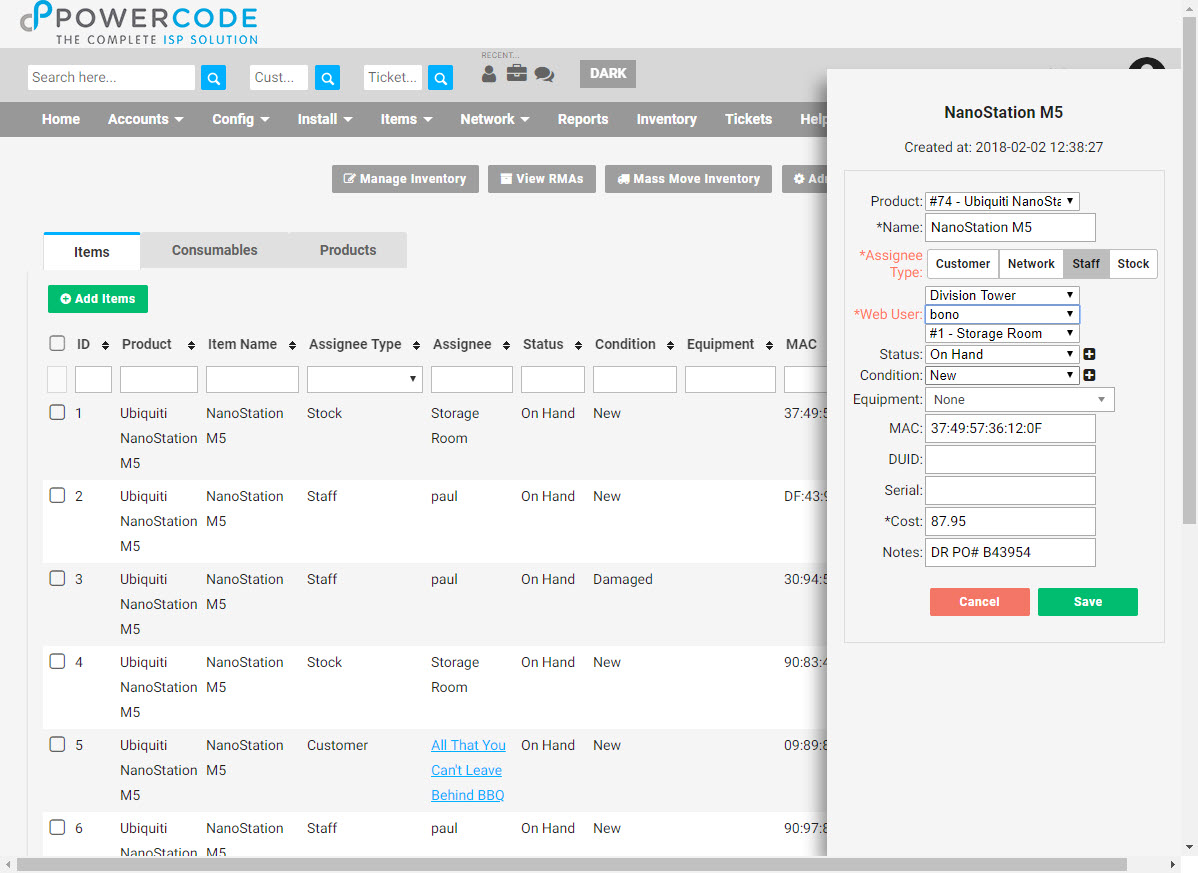
When it’s time for a tech to remove an item from the stock room, they simply hit the edit pencil icon next to the item, choose the ‘Staff’ Assignee Type and select their name from the Web User drop down. When it’s added to a customer account nothing further is necessary as it will automatically remove the item from it’s location and add it under the ‘Equipment’ tab of the customer.

To learn more or see it in action watch this video:

By |2018-06-22T11:52:55-05:002018 June 21st|News|Comments Off on Manage Your Inventory

Release 18.06.21 [Beta]

New Features

  • New redesigned Add / Edit BMU page.
  • Preseem BMU – added the ability to add Preseem as a BMU.

Bug Fixes

  • Various fixes to graphing including certain probes not graphing, BMU throughput not graphing properly, and graphs missing chunks of data.
  • Services will no longer fail to delete if FCC data is attached to it.
  • Validation errors when saving a service will now display an alert only once.

Miscellaneous

  • Added missing datepicker selector to the account and account class reports.
  • Added preseem bandwidth gathering endpoint to the API.
  • Added an internal email event trigger when a customer status changes.
  • Customer files now sort by filename as default.
  • Updated several alignment aspects on the BMU Statistics page.
  • Updated Saisei to show the correct version string.
  • Updated Saisei Application list.
By |2018-06-21T14:41:07-05:002018 June 21st|Changelog|Comments Off on Release 18.06.21 [Beta]

Saisei STM Update 7.2 9617

  • Improvements to configuration wizard – added the setting of Ubuntu and STM passwords to the default accounts for increased security.
  • Password security improvements: config wizard forces CLI/GUI/Rest and shell passwords to be changed, to something not readily guessable.
  • Fix problems with changing system name, which could lead to the system becoming inconsistent.
  • Support history collection and analysis for all users, up to 20,000.
  • Improve built-in packet capture facility.
  • Fix some problems with traffic accounting in complex configurations, which could lead to traffic being counted twice and to limits being applied incorrectly.
  • Allow 32 bit Autonomous System numbers, previously the STM only handled 16 bit values
  • Correct the flow counts associated with policy entries
  • P2P applications were being incorrectly identified and placed in other application groups, this has been corrected.
  • FTP transfers were being incorrectly identified, the initial handshake was correct however the data transfer phase was not, this has now been corrected
  • Heavy traffic loads together with heavy REST usage triggered system reloads, this is now fixed
  • The behavior for packet forwarding when using a LAG interface has been changed, originally packets were “rebumped” and could perhaps be sent out on an interface not associated with the BITW port pair that the inbound packet was accepted on. The behavior is now changed to always send packets on the egress interface linked directly to the ingress interface.
  • Correct an error when creating user specific applications. The REST documentation allows a user to create a wildcarded application to capture all applicaations containing the wild carded string, perhaps there are several entries in the application tables containing the string “dstv.com”, the user merely needs to create a new application with the server string dstv.com to capture all such entries. This was not working correctly and has been corrected.
  • Due to a cabling error where Internal and External cables were swapped a crash was observed which was discovered to be associated with the system running out of Egress Flow Class table entries, the software was found not to return an error state and hence caused a crash. The error return has now been corrected.
  • Poor REST API performance has been observed at an installation and found to be associated with an excessive number of internal hosts being created, partially due to inbuilt processing
By |2018-06-20T20:25:22-05:002018 June 15th|Changelog|Comments Off on Saisei STM Update 7.2 9617

18.06.15 Release [Beta]

System Changes

  • Late Fee – you can now specify a specific number of days after a bill is due to apply a Late Fee (X Days After Due).
  • Customer Portal Balance – customer portal now warns when overpaying on the account balance instead of the amount due.

Features

  • Created new cnMaestro page for Access Point data.
  • Created new cnMaestro page for Subscriber Module data.
  • Redesigned the Add / Update Services page.

Miscellaneous

  • Fixed description wrapping off-screen in the transaction log list.
  • Fixed an issue where equipment that wasn’t rate limited would block anything else from being limited.
  • Search now retains search results when a session expires through the Staff Portal.
  • Fixed an issue with saving contact information, specifically passwords.
  • Network Site files will now delete fully.
  • Fixed an issue where changing a customer to archived status from a Scheduled Event would fail to fully archive the customer.
  • Customers will now be redirected to a Success page when completing a payment in the Customer Portal.
  • Fixed an issue where timestamps would generate incorrectly in the Customer Portal.
  • Updated procera data types to prevent issues with syncing service data.
  • Saisei assured and restricted settings now save properly.
  • Fixed network sites View on Map link to function properly.
  • Event logs for address changes no longer improperly label latitude as longitude.
  • Device reboot button no longer shows if a cnMaestro device is in bad status.
  • Fixed issues with loading correct census blocks for the FCC 477 report.
  • CustomerID no longer opens transaction history in the Account Class report.
By |2018-06-20T16:20:24-05:002018 June 15th|Changelog|Comments Off on 18.06.15 Release [Beta]

Automated System Emails

Powercode provides automatic emails to provide top-notch communication to your customers and alert employees of important events within the system. If you haven’t looked at your system emails lately to see what’s active and what’s not now would be a great time to review them. At the time of this article we have thirty different events that can send emails to the contact(s) listed on an impacted account. There are thirteen different triggers to let employees know of changes that they should be aware of and one for anyone who has a schedule set up.

Send Event Triggers
Send to Customers Send to Internal Users
Account Created API Error(s) Detected
Account Disconnection BMU Status Change
Activated for First Time Customer Delinquency Alert
Completed Portal Password Reset Inventory Min Stock Level Alert
Contract Expires in X Days Jobs Completed Notification
Credit Card Expires Next Month Network Notification
Customer Portal Ticket Updated Paging Suppression Disabled
Customer Portal Username and Password Paging Suppression Enabled
Customer Submitted Payment Ticket Created or Modified
Daily Bandwidth Report Ticket Follow Up Reminder
ECheck Auto-Reconciliation Failed Ticket Responsible User/Group Changed
Email Generated Receipt Ticket Status Changed
Email Past Invoice Ticket Technical User/Group Changed
Financial Transaction Failed
Financial Transaction Successful Install/Service Call Scheduled (For User Scheduled)
Installation Scheduled
Manual Payment Entered
Monthly Billing Complete
No Automatic Card Set
Payment Refund Completed
Positive Balance on Bill Day
Positive Balance X Days Before Bill Due By Day
Positive Balance X Days Before Grace Period Ends
Requested Portal Password Reset
Send Call Log
Send Email X Days Before Billing
Service Call Scheduled
Status Changed on Account
Ticket Created or Updated
Used Percentage of Allotted Bandwidth

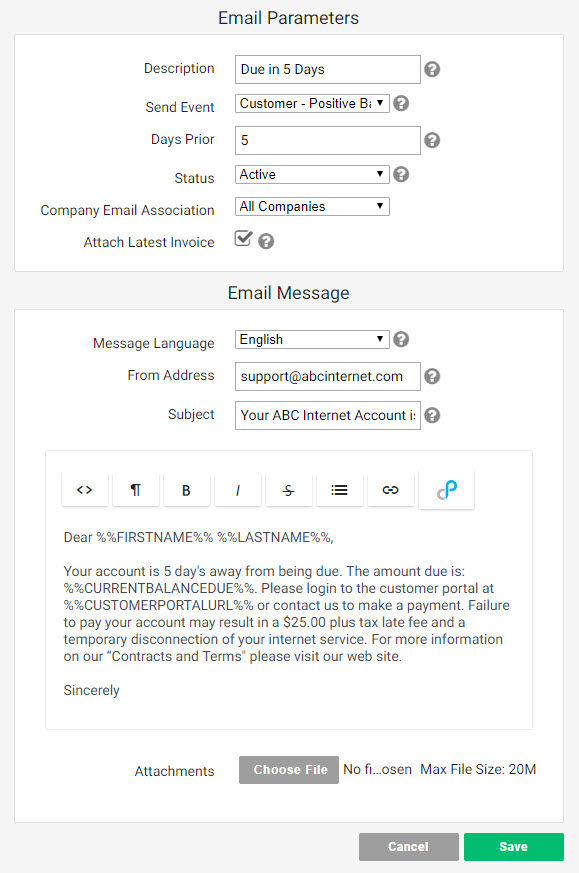
From the ‘Config’ tab a the top and select ‘System Email’ to see which emails are currently setup, check the status column to see if they’re actively in use or not. If you don’t see an email you want already in the table, click on the ‘+Add System Email’ button in the upper left. Name the email in the ‘Description’ field and chose what should trigger it from the ‘Send Event’ drop down. Note that some events allow for a ‘Days Prior’ field. The email can be set to only send for one of your companies or all from the ‘Company Email Association’ field. The option is given to include the latest invoice each time this email is triggered, this is only recommended for new billing or delinquency warning emails. Set the from address and subject for the recurring message. Fill out the body of the email which gives basic formatting features including hyperlinking. Choose a attachment if relevant and click ‘Save’.

Make sure you are taking advantage of the dynamic variables to personalize the message to each customer. Click on the Powercode logo on the far right of the email body to show the available fields that will be populated by the associated info from each customers account, see the chart below. In addition to providing details about the triggered event this is a good way to encourage use of customer portal or provide other helpful info about their account.

Dynamic Variables
Customer Name Customer ID
Customer Notes Security Code
Contact First Name Contact Last Name
Contact Email Address Contact Home Phone
Contact Main Phone Contact Work Phone
Contact Mobile Phone Current Time
Customer Status Total Bandwidth Used (GB)
Total Bandwidth Allowed (GB) Bandwidth Remaining (GB)
Customer Portal Username Customer Portal Password Reset Link
Current Balance Total Current Balance Due
Company (ISP) Name Today’s Date
Yesterday’s Date Customer Portal URL
Physical Address Physical Street 1
Physical Street 2 Physical City
Physical State Physical Zip Code
Latitude Longitude
Next Bill Cycle Day

When Powercode was installed default system emails were loaded with generic messages. It is a good idea to review each and make sure it captures your company’s messaging tone and includes the info you want for each type of event. To do this from the action column click the ‘Select an action’ drop down and choose ‘Edit’, then do it again on the next page. Edit your message and take full advantage of the dynamic variables.

By |2018-06-08T14:34:44-05:002018 June 8th|News|1 Comment
Go to Top