Powercode provides automatic emails to provide top-notch communication to your customers and alert employees of important events within the system. If you haven’t looked at your system emails lately to see what’s active and what’s not now would be a great time to review them. At the time of this article we have thirty different events that can send emails to the contact(s) listed on an impacted account. There are thirteen different triggers to let employees know of changes that they should be aware of and one for anyone who has a schedule set up.
| Send Event Triggers |
|---|
| Send to Customers | Send to Internal Users |
|---|---|
| Account Created | API Error(s) Detected |
| Account Disconnection | BMU Status Change |
| Activated for First Time | Customer Delinquency Alert |
| Completed Portal Password Reset | Inventory Min Stock Level Alert |
| Contract Expires in X Days | Jobs Completed Notification |
| Credit Card Expires Next Month | Network Notification |
| Customer Portal Ticket Updated | Paging Suppression Disabled |
| Customer Portal Username and Password | Paging Suppression Enabled |
| Customer Submitted Payment | Ticket Created or Modified |
| Daily Bandwidth Report | Ticket Follow Up Reminder |
| ECheck Auto-Reconciliation Failed | Ticket Responsible User/Group Changed |
| Email Generated Receipt | Ticket Status Changed |
| Email Past Invoice | Ticket Technical User/Group Changed |
| Financial Transaction Failed | |
| Financial Transaction Successful | Install/Service Call Scheduled (For User Scheduled) |
| Installation Scheduled | |
| Manual Payment Entered | |
| Monthly Billing Complete | |
| No Automatic Card Set | |
| Payment Refund Completed | |
| Positive Balance on Bill Day | |
| Positive Balance X Days Before Bill Due By Day | |
| Positive Balance X Days Before Grace Period Ends | |
| Requested Portal Password Reset | |
| Send Call Log | |
| Send Email X Days Before Billing | |
| Service Call Scheduled | |
| Status Changed on Account | |
| Ticket Created or Updated | |
| Used Percentage of Allotted Bandwidth |
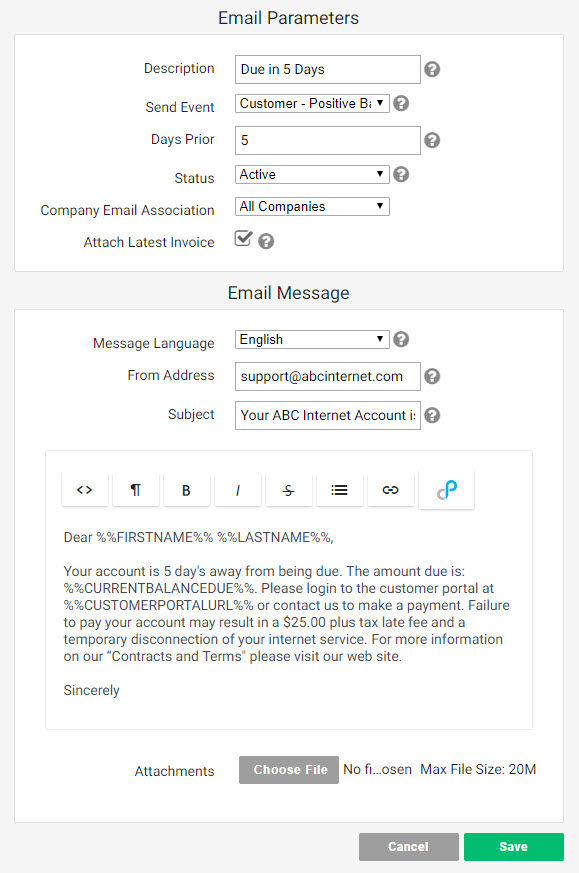
From the ‘Config’ tab a the top and select ‘System Email’ to see which emails are currently setup, check the status column to see if they’re actively in use or not. If you don’t see an email you want already in the table, click on the ‘+Add System Email’ button in the upper left. Name the email in the ‘Description’ field and chose what should trigger it from the ‘Send Event’ drop down. Note that some events allow for a ‘Days Prior’ field. The email can be set to only send for one of your companies or all from the ‘Company Email Association’ field. The option is given to include the latest invoice each time this email is triggered, this is only recommended for new billing or delinquency warning emails. Set the from address and subject for the recurring message. Fill out the body of the email which gives basic formatting features including hyperlinking. Choose a attachment if relevant and click ‘Save’.
Make sure you are taking advantage of the dynamic variables to personalize the message to each customer. Click on the Powercode logo on the far right of the email body to show the available fields that will be populated by the associated info from each customers account, see the chart below. In addition to providing details about the triggered event this is a good way to encourage use of customer portal or provide other helpful info about their account.

| Dynamic Variables |
|---|
| Customer Name | Customer ID |
| Customer Notes | Security Code |
| Contact First Name | Contact Last Name |
| Contact Email Address | Contact Home Phone |
| Contact Main Phone | Contact Work Phone |
| Contact Mobile Phone | Current Time |
| Customer Status | Total Bandwidth Used (GB) |
| Total Bandwidth Allowed (GB) | Bandwidth Remaining (GB) |
| Customer Portal Username | Customer Portal Password Reset Link |
| Current Balance Total | Current Balance Due |
| Company (ISP) Name | Today’s Date |
| Yesterday’s Date | Customer Portal URL |
| Physical Address | Physical Street 1 |
| Physical Street 2 | Physical City |
| Physical State | Physical Zip Code |
| Latitude | Longitude |
| Next Bill Cycle Day |
When Powercode was installed default system emails were loaded with generic messages. It is a good idea to review each and make sure it captures your company’s messaging tone and includes the info you want for each type of event. To do this from the action column click the ‘Select an action’ drop down and choose ‘Edit’, then do it again on the next page. Edit your message and take full advantage of the dynamic variables.
